
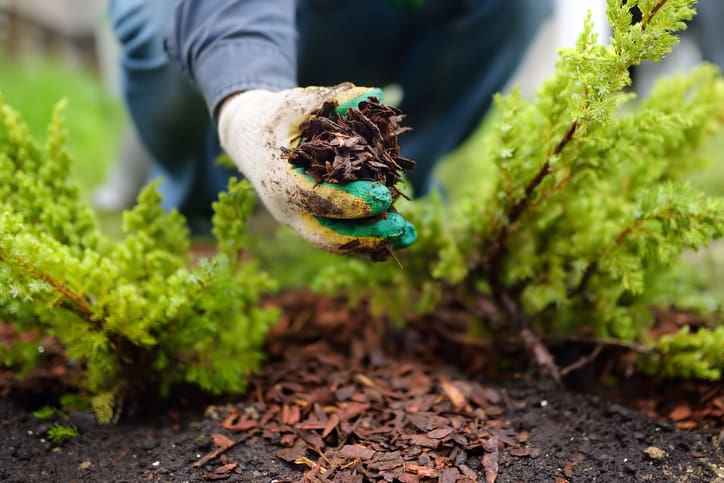
Mulching protects soil, saves water, stops weeds, and feeds your garden.
If you want healthier plants with less work, you need mulch. In this guide on All About Mulching: Protecting and Nourishing Your Garden, I share pro tips, real wins, and common mistakes I have seen over years of hands-on gardening. You will learn what to use, how to apply it, and when to refresh it, so your garden thrives in every season.
What Is Mulch and Why It Matters
Mulch is any material you spread over soil to cover it. It can be organic, like leaves or wood chips. It can be inorganic, like rock or fabric. The goal is simple: protect, regulate, and feed the soil life that feeds your plants.
All About Mulching: Protecting and Nourishing Your Garden starts with a clear idea of what mulch does. It keeps moisture in. It slows weeds. It buffers heat and cold. It also cuts erosion and adds a neat, finished look to beds.
Benefits of Mulching for Soil, Plants, and Ecosystems
Mulching pays you back in many ways. In field tests, mulch can cut water loss by up to half in hot months. It keeps soil cooler in summer and warmer in winter. It also breaks the heavy splash of rain that compacts soil.
Key wins you can expect:
- Moisture savings. Soil stays damp longer, so you water less.
- Better soil health. Organic mulch feeds microbes and worms as it breaks down.
- Fewer weeds. A 2–3 inch layer blocks light, which seeds need to sprout.
- Steady soil temps. Roots avoid stress from sharp highs and lows.
- Cleaner harvests. Fruit on the ground stays cleaner and drier.
- Less erosion and runoff. Beds hold shape, even in storms.
- Better looks. Beds look tidy and show off plants.
I track water use in my raised beds each summer. When I add straw or shredded leaves, I water about one third less. Tomatoes set more fruit, and the soil has that sweet, earthy smell that means life. All About Mulching: Protecting and Nourishing Your Garden is not hype. It is a simple step with real gains.
Types of Mulch: Organic vs Inorganic, and When to Use Each
You have two broad groups to choose from. Organic mulch feeds soil as it breaks down. Inorganic mulch lasts longer but does not add food.
Top organic mulches:
- Arborist wood chips. Great for trees and shrubs. Long lasting. Free from many tree crews.
- Shredded bark. Good for paths and beds. Slow to break down. Even look.
- Straw (not hay). Great for veggies and berries. Light and clean. Replace each season.
- Leaves or leaf mold. Free and rich in minerals. Shred with a mower to stop matting.
- Grass clippings. Thin layers only. Let them dry first to avoid slime.
- Compost. Best top layer for veggie beds. Feeds fast. Top with straw to hold in place.
- Pine needles. Light and airy. Good around blueberries and acid lovers.
Common inorganic mulches:
- Gravel or rock. Good for hot, dry zones and paths. Reflects heat. Lasts for years.
- Landscape fabric. Helps on slopes under gravel. Not great in planting beds long term.
- Rubber mulch. Works in play areas. Not for veggie beds or soil health.
Tips from the field:
- Use arborist chips around trees and shrubs. In my tests, they cut weeds by over 80 percent after one season.
- Avoid thick, fine bark in veggie beds. It can shed water when dry.
- Cocoa hulls smell nice but can harm pets if eaten. Skip them if you have dogs.
If you stay focused on All About Mulching: Protecting and Nourishing Your Garden, choose mulch for the job. Think about the plants, soil, water needs, and your climate.
How to Mulch Like a Pro: Step-by-Step Guide
Good mulch work is simple. It needs a plan. Here is my field-tested method.
- Step 1: Prep the bed. Pull or slice weeds at the base. Water the soil well.
- Step 2: Test and feed. If needed, add compost or a slow feed. Scratch it in.
- Step 3: Edge the bed. A clean edge holds mulch and gives a neat line.
- Step 4: Choose the right mulch. Match it to plants and goals.
- Step 5: Measure depth. Use 2–3 inches for most beds. Use 3–4 inches for paths. Keep mulch 3–6 inches off trunks and stems to show the root flare.
- Step 6: Spread even. Do not pile. Feather the edge thin.
- Step 7: Water in. This settles the layer and stops blow-off.
- Step 8: Top up as needed. Add a light layer each year for looks and function.
Handy math:
- Volume in cubic yards = (Area in square feet × depth in inches ÷ 12) ÷ 27.
- A 10 by 20 bed at 3 inches needs about 1.85 cubic yards.
I learned the hard way with a young maple. A hired crew made a mulch volcano. The bark stayed wet. The trunk rotted. We lost the tree. Now I teach All About Mulching: Protecting and Nourishing Your Garden with this rule: show the flare, never bury it.

Seasonal Mulching Strategies
Mulch needs shift with the seasons. Adjust your layer and type to match plant needs and weather.
Spring:
- Warm soil first, then mulch. Wait until the soil dries a bit.
- Use compost under straw in veggie beds. It boosts early growth.
- Watch for slugs under thick, cool mulch. Hand pick or use traps.
Summer:
- Maintain 2–3 inches in beds. Check after storms and top up thin spots.
- Use light-colored mulch to keep roots cool in heat waves.
- Water deep, less often. Mulch helps the soak reach roots.
Fall:
- Save leaves. Shred and spread 2–3 inches on beds.
- Around trees, add fresh wood chips. Stop at the drip line if you can.
- In veggie beds, mulch garlic and perennials before the first freeze.
Winter:
- In cold zones, add a loose layer after the ground cools.
- Do not mulch warm soil too early. It can draw pests and delay dormancy.
- In wind zones, pin straw or leaves with branches or netting.
Staying on top of All About Mulching: Protecting and Nourishing Your Garden all year makes care easy. You set a buffer for each season. Your plants will thank you.

Source: sciencesource.com
Mulch Mistakes to Avoid and How to Fix Them
I see the same errors year after year. Here is how to spot and solve them fast.
- Volcano mulching. Big piles at a trunk cause rot. Fix by pulling mulch back to show the flare.
- Wrong depth. Too thin lets weeds through. Too thick can starve roots of air. Aim for 2–3 inches.
- Nitrogen tie-up. Fresh wood on veggie beds can slow growth. Fix with a compost cap or use aged chips.
- Matted leaves. They shed water. Shred them with a mower first.
- Slugs and pests. Thick, cool mulch can shelter them. Use traps and thin layers in spring.
- Weed fabric in beds. Roots tangle with it, and soil dies under it. Swap for compost and chips.
- Dyed mulch from unknown wood. It may break down fast or bring issues. Choose local, clean sources.
When I coach clients on All About Mulching: Protecting and Nourishing Your Garden, I stress air and space. Keep mulch off trunks, crowns, and stems. Let rain and light reach the soil, not drown it in a blanket that never dries.

Smart Mulching for Different Garden Areas
Match your mulch to the plant and task. You will get better results and less fuss.
Vegetable beds:
- Use compost plus straw or shredded leaves. Depth 2–3 inches.
- Pull back mulch a bit to warm soil for early crops.
- Avoid thick wood chips in the root zone of fast crops.
Fruit trees and berries:
- Use arborist chips to the drip line. Keep a mulch-free donut around the trunk.
- Straw works well for strawberries to keep fruit clean.
Perennials and roses:
- Shredded bark or compost works well. Refresh each spring.
- Keep mulch off the crown to stop rot.
Natives and xeriscape:
- Gravel or rock can help in hot, dry spots. Combine with drip lines.
- In cooler zones, use thin wood chips to feed soil life.
Containers:
- A 1-inch layer of fine bark or coir slows water loss.
- In heat, add a light shade cloth for a mid-day break.
Paths and play areas:
- Use wood chips 3–4 inches deep. Rake to level each season.
All About Mulching: Protecting and Nourishing Your Garden is about fit. When you match mulch to place and plant, you save time and get better growth.
Sustainable and Budget-Friendly Mulching
Great mulch does not need a big budget. Use local, clean, and safe sources.
- Ask a local tree crew for a load of fresh chips. Free or cheap. Great for trees and paths.
- Rake and shred your leaves. Make leaf mold by piling them for a year.
- Save and dry grass clippings. Use in thin, mixed layers.
- Use plain cardboard under chips to smother tough weeds. Wet it first.
- Make compost. A thin top dress each season is like a slow, steady meal.
Choose mulch that fits your climate and water goals. Avoid waste wood with unknown paint or oil. When I shifted to homegrown mulch, costs dropped, soil sponges grew, and beds bounced back faster after heat waves. That is the heart of All About Mulching: Protecting and Nourishing Your Garden.

Frequently Asked Questions of All About Mulching: Protecting and Nourishing Your Garden
How thick should mulch be?
Most beds do best with 2–3 inches. Paths and weed-prone areas can use 3–4 inches.
How far from the trunk should I keep mulch?
Keep mulch 3–6 inches away from trunks and stems. Show the root flare to prevent rot.
Is fresh wood chip mulch safe for vegetables?
Use fresh chips on paths and around perennials. In veggie beds, cap with compost or use aged chips to avoid slow growth.
Does mulch attract pests?
Mulch can shelter slugs and insects. Use thin layers in spring, add traps, and keep mulch off stems.
Which mulch breaks down the fastest?
Compost and shredded leaves break down fast. Straw breaks down in one season and is easy to refresh.
Can I mulch over weeds?
Yes, but prep first. Cut or pull weeds, lay cardboard if needed, then add 3–4 inches of mulch.
Does mulch change soil pH?
Most mulches have a small effect. Over time, composted mulches tend to buffer soil toward neutral.
Conclusion
Mulch is a simple tool with big results. It saves water, blocks weeds, feeds soil, and protects roots. When you choose the right type and apply it well, your garden grows strong with less work.
Start small this week. Edge one bed, add a 2–3 inch layer, and keep it clear of trunks. Track water use and plant health for a month. You will feel the win. If you want more tips on All About Mulching: Protecting and Nourishing Your Garden, subscribe, share this guide, or drop your questions in the comments.